For quite some time, I have been wanting to try out watercolor with embroidery and I decided that Easter was the perfect opportunity to give it a go. I bought an inexpensive set of watercolors… More

creating meaningful moments in the home
For quite some time, I have been wanting to try out watercolor with embroidery and I decided that Easter was the perfect opportunity to give it a go. I bought an inexpensive set of watercolors… More

St. Patrick’s Day is just around the corner, and you may be thinking about what you have in your closet with a pop of green so that you don’t get pinched. Well look no further!… More

One of my favorite things to do in the month of February is to shower my kids with words of affirmation leading up to Valentine’s Day. I have done this several different ways over the years,… More


If you’ve been following my blog, then you know that embroidery has become one of my passions. I love learning new stitches and creating beautiful things, and these vintage style necklaces have become some of my favorites. They may look complicated, but they are actually easier than you would expect.
You can find countless tutorials on youtube on how to do various embroidery stitches, but one of my goals for 2024 is to create my own channel to teach people how to do embroidery. Stay tuned for more information about that. If you are wanting to learn how to make similar necklaces or keychains, here is what you will need.
cardboard for bezel inserts (I cut mine on my Cricut Maker 3, but you can use scissors and an empty cereal box)
#commissionsearned

Space out your embroidery so that you can easily cut around each one. I like to use a water soluble fabric marker to draw little circles in the same size as the bezel so that each one fits inside of the circle. I also use the fabric marker to trace around the fabric before I cut it. Leave enough of an edge to fit around the cardboard circle insert.
Optional tip: I like to cut a small circle of felt (the same size as the cardboard insert) to place in between the fabric and the cardboard circle to make the fabric and embroidery puff up a bit.

Cut a small circle out of cardboard to fit inside of the bezel. Some bezels come with glass or metal inserts so you don’t have to make your own. Use a running stitch around the excess fabric and cinch it to tighten around the back. Then use the rest of the thread in a criss cross pattern to tighten the folds in place so that the fabric lays as flat as possible against the cardboard.


Use a generous glob of E6000 crystal clear glue inside of the bezel. You should have a thin layer around the inside of the metal, but not so much that it will squeeze out over the edge when you press the embroidery on it. Place the fabric/embroidery inside of the bezel and hold in place with 2-3 clothes pins. Let them dry for 24 hours and then remove the clothes pins and gently fluff up any indents with your fingers. Add a chain and your necklaces are ready to wear. If you are making keychains, then attach the keychain holders instead of adding a necklace chain.
I’ve included a picture of my most recent craft fair so that you can see how I display my necklaces and keychains. I used my Cricut Maker 3 to create the necklace holders out of card stock. #commissionsearned I do currently have a small collection of St. Patrick’d Day embroidered necklaces in my Etsy Shop if you are looking to purchase one.

My favorite thing about making these necklaces and keychains is that each one is unique and there are so many variations you can create. Embroidery is a lost art, but it is making a come back. If you are interested in learning more about embroidery, follow along with me on my blog. I have a lot of fun projects and tutorials planned for the new year!
For more embroidered necklaces, check out my blogpost St. Patrick’s Day Necklaces.


Wondering what to do with those leftover faux florals from Fall? How about using them to make these elegant natural Christmas centerpieces? You can’t go wrong with this easy DIY, whether you are making one to add to your own decor or several to put on each table for a holiday party. They would also make stunning centerpieces for a Christmas wedding.
Here’s what you will need:
wood rounds (about 4 inches each)
#commissionsearned

Start your project by pouring white acrylic paint into your clear plastic ornaments. Tip: Before adding the white paint, swish a bit of rubbing alcohol inside of each ornament and then pour out the excess. Let it dry before adding the white paint. This will help the paint adhere to the plastic. Believe me when I say that this step is important! I ruined several ornaments by skipping this step, and ended up with a blotchy paint job.

Once the alcohol has dried, pour a bit of paint into each ornament. Swirl is around so that the entire inside of the ornament is coated with white paint, then turn each ornament upside down to drain the excess paint out. I left my ornaments like this overnight, and then turned them right side up for another 24 hours to make sure that the paint was fully dry before moving onto the next step.

Once the paint is dry, cut a piece of twine to loop around the top of the ornaments. I added a dab of hot glue to the back to keep the twine in place and then tied each in a double knot. Trim the twine to your preferred length.


Use floral tape to secure the stems of the faux florals together to form a small bouquet. Make sure to wrap the stems tightly and to keep it small enough to fit inside the top hole of the ornament. Leave out 3 small pieces to place inside of the tiny gold ornament.

Now you just need to use your hot glue gun to secure everything in place. I put a tiny dab of glue on the stem of the gold ball that I added to the gold ornament before I slid it into place to hold those florals in the right place as well.
I’ve included a short video tutorial so that you can see, step by step, how I created these gorgeous Christmas centerpieces.
Let me know if you decide to make some for your home or for your holiday gathering. You could even change the colors and florals to coordinate with any color scheme. And if you missed my last blogpost, you can see a peek of my Floral Embroidered Christmas Tree in the last picture on this post. You’ll find the instant download PDF pattern and printable instructions in my new Etsy Shop, thistles and rainbows.
Merry Christmas from Kerri Creates!


When I was in middle school, I took a home economics class and we spent some time learning how to do embroidery. It’s something that I dabbled in a bit over the years, but recently, I have fallen in love with it in a new way. I have been working on a collection of embroidered pieces to sell locally, and am now branching out to create my own embroidery patterns for my new Etsy Shop, Thistles and Rainbows. This is the first full pattern that I created from scratch and I’m super proud of myself!
I was standing in line at the grocery store a couple of weeks ago and I saw a display of candles in this color pallet. I snapped a quick picture and decided that I had to create something featuring this beautiful array. With Christmas just around the corner, I set out to make my floral Christmas tree embroidery design.

Recently, I had the privilege of spending the weekend in a cozy cabin in the woods with my daughter and her orchestra class for a music retreat. I knew I would be sitting for hours, listening to middle schoolers practice, so I brought my traced out tree pattern, needles, and embroidery thread. I stitched out every flower, leaf, twig, and holly berry to the sound of stringed instruments. They even played a medley of Christmas songs, so it could not have made for a better setting to indulge in one of my favorite past times. I am affectionately calling this pattern “cabin tree.”
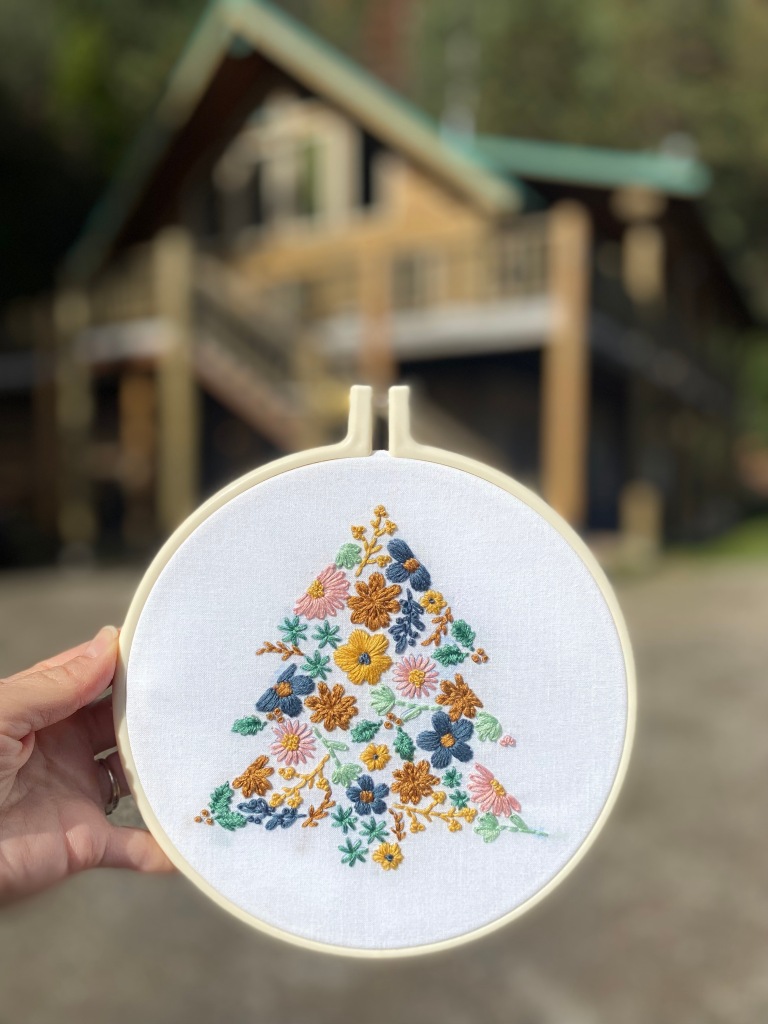

If you love embroidery as much as I do, and are looking for a new pattern to add to your holiday collection, or if you have always wanted to try embroidery, but haven’t known where to start, this is the perfect pattern. You can find the PDF printable instant download for “cabin tree” in my Etsy shop. I have included the printable pattern in two different sizes, as well as a detailed set of instructions, tutorials, and tips for making this a great project for beginners, and yes, seasoned creatives will enjoy it just as much!


If you are new to embroidery and need some supplies to get started, here’s a great list:
#commissionsearned
And if you have come to this blog post because you purchased my Floral Christmas Tree pattern on Etsy, first of all, thank you for supporting my small business. In addition to the PDF pattern and instructions you purchased, I’ve included some short video tutorials to help you with the various stitches.
I hope that these short tutorials made it easy to learn some of the most commonly used embroidery stitches. Follow my Etsy Shop for other PDF patterns and printables and have a wonderful Christmas!


If you are searching for a simple, yet elegant way to personalize your Thanksgiving table, look no further. These beautiful DIY place cards are the perfect addition to your tablescape and you will not believe how easy they are to make.
Here’s what you will need:
Fall florals (I found mine on clearance at Walmart)
#commissionsearned
I’ve included a video tutorial to show you how to create these little beauties, and my instant download Thanksgiving place card PDF makes it easy for you to put together as many as you need so that each of your guests has a personalized place setting.
I’ve also included another simple place card idea that requires very little prep for those of you who just want to add name cards to your Thanksgiving table without any crafting.

How cute are these mini wooden easels!?! For this look, you will just need to order a set of easels and print off my Thanksgiving PDF. The rectangular cards are included in the same link as the circular ones, so you will get both options in the same download. Simply print as many as you’ll need, cut on the dashed line, write the names of your guests in the center, and place each card on an easel. #commissionsearned
Have a wonderful Thanksgiving and enjoy the feasting and the fun with those you love!


It’s hard to believe that Thanksgiving is just a couple of weeks away. And while some are ready to move onto Christmas the moment Halloween is over, I am not. I like to linger in Fall a bit longer, and in my house, the Christmas decorations absolutely do not come out until after Thanksgiving. Who’s with me?
My kids may be getting older, but I am a sucker for adding a bit of whimsy to my home. So this week I went to work on this adorable felt sugar cookie set featuring all of your Fall favorites: a pumpkin, acorn, leaf, sunflower, scarecrow, and of course the turkey.
Not only does this set create the cutest opportunity for pretend play for littles, but it also can double as a garland to hang along your mantle. You can even include some poms or beads between each “cookie” to make an even more eye-catching piece.
To make a cookie set of your own, you will need:
FALL FELT SUGAR COOKIE AND GARLAND PDF PATTERN (INSTANT DOWNLOAD)
embroidery thread to match your felt
heat n bond light (optional)
freezer paper (optional)
mini heat press or iron (optional)
water-soluble fabric pen (optional)
#commissionsearned


You will find detailed instructions on how to make this adorable set in my Etsy Shop. Click here to find the PDF Instant Download. Have fun crafting and be sure to leave a comment to let me know if you made a Fall garland or cookie set of your own.


I love Fall!!! The crisp cool mornings and the beauty of leaves changing to vibrant shades of red, yellow, and orange. The changing of seasons is always a great time to incorporate some seasonal touches into my home. I am not much of a wreath person, but last year, I wanted to add something with an Autumn vibe to my front door, and this simple floral hanging added just the right touch I was looking for.
I already had a large wooden embroidery hoop and a ball of twine, so I just needed to purchase a few faux florals. I found these at my local Walmart, but you can order some similar yellow flowers here and orange berries here. #commissionsearned
I started by tying the twine to one side of the hoop, just above the center. I wanted to be able to reuse the embroidery hoop for something else, so I did not use glue to hold my twine to the hoop. If this was going to be permanent, I would have put a dot of hot glue on the hoop to secure the twine in place.
Wrap the twine as many times as you would like to get the desired thickness you are going for. I tied my twine off in the back where it wasn’t visible and then added some scotch tape on the back of the sides to secure the twine to keep it from slipping down the hoop.
Use scissors or a wire cutter to trim the length of your florals so that they are hovering above the inside of the hoop. The pieces closer to the sides will be shorter than the pieces in the middle.
Weave the stems of the florals back and forth a couple of times through the twine. I secured each stem with a piece of scotch tape on the back to keep it in place. I spaced my florals apart and put them at various heights to give dimension. You can group yours closer together or overlap some depending on what looks beautiful to you.

The last step is to add a piece of twine to the top so that you can hang your Fall wreath. I just looped mine on the screw at the top of the embroidery hoop.
I got so many compliments on this simple little wreath and it made me happy to see the vibrant colors every time I looked at my front door.


Every year, my daughter’s school holds a talent show and it is something that everyone looks forward to. I have the wonderful opportunity of being a part of the Theater Booster Club (TBC). The TBC is a group of parents who support all things “theater” at the school, and one of my favorite tasks is creating fun decor for our events.
Last year, we had an “Old Hollywood Theme,” which included giant film reels and oversized popcorn boxes. I was hoping to reuse some of our incredible props from last year, and the red and white striped popcorn boxes were just begging to be used in a circus-themed event. So last May, our team started planning to make this year’s talent show “CIRCUS” an EPIC event for the kids and their families to enjoy.
As you can see, our fabulous popcorn boxes made another debut, but the backlit silhouettes and circus sign stole the show. Our stage was amazing! Just enough to make for an eye-catching backdrop for our performers, but not too much to take away from their acts. Here’s how we got this effect. Once again, my mini mooka projector came in handy. (#commissionsearned) I found some cool silhouettes on Pinterest and took a screenshot of them. Then I wirelessly connected the projector to my computer and drew them out on 1/4 of a cardboard refrigerator box. I was able to get all 4 silhouettes out of one large box, and I painted them black with acrylic paint.

Because cardboard is so flimsy, and we need the silhouettes to stand up, our awesome facilities guy at our school built us 5 wooden stands to attach the silhouettes to. We stretched white muslin around the frames. Each frame was 6 ft tall, so I purchased 10 yards of muslin to cover all 5 frames.
The middle frame was purposefully empty because we opened the talent show with a rendition of “The Greatest Show” from the movie The Greatest Showman. Our ringmaster stood in a pose behind the middle silhouette, and as he started to sing, he made his way onto the stage, followed by a choir of 8 other students. We had 4 kids already on stage waving signs that said “WOOAAH” to get the audience to participate. Then the rest of the kids (who wanted to be in the opening act) paraded across the stage and around the amphitheater, singing along as they went. It was such a fun way to kick off the night.

As the evening went on and it got darker in the outdoor amphitheater, the colored lights behind the silhouettes became vibrant and created such a wonderful display.

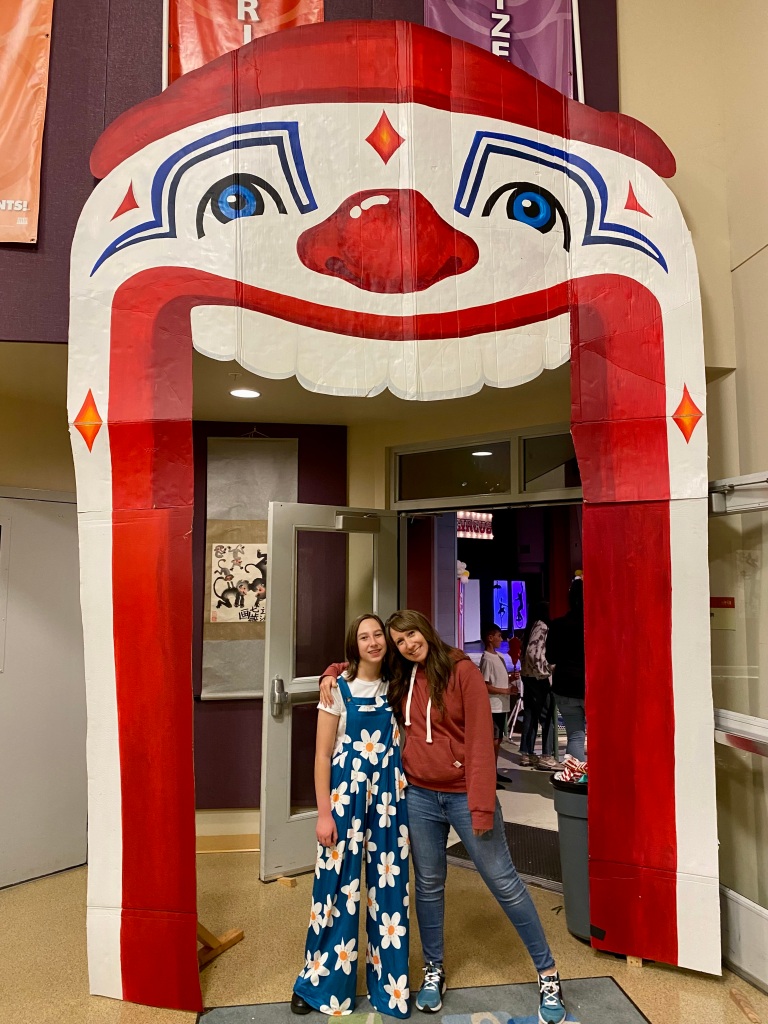
Not only was our stage top-notch, but we added some wonderful touches all around the room. One of our amazing moms painted a huge clown that was mounted above the double doorway. I was able to project the clown onto the 4 panels of another refrigerator box and traced out the image (that I also found on Pinterest). Then I handed it off to the most creative mom, who took it to the next level by adding additional cardboard sides to make the mouth touch all the way to the floor. She painted it with such detail that it looked fantastic, and she added PVC pipe to help mount it above the doors. You can see just how tall it is in the picture of my daughter and I standing under it.

That same mom created a ticket booth at the entrance, and I made a big sign that said, “WELCOME TO THE GREATEST SHOW” using my Cricut Maker 3 and black cardstock. (#commissionsearned)

Our team painted the most adorable circus-themed “photo booth” with a lion, ringmaster, and clown…another image that I projected onto an open refrigerator box. We used a variety of colors of acrylic paint and brushes and it turned out great! #commissionsearned


My Cricut came in handy once again for these directional signs, and they were not just for decoration, they actually led to the locations displayed on the arrows. I used colored cardstock in red, yellow, and black and a variety of fonts from Cricut Design Space. We wanted to be able to reuse the arrows that we had painted and cut out of cardboard, so I attached the letters with glue dots so they were easily removable. The glue dots also came in handy for sticking the white and yellow balloons together to look like clumps of popcorn in the oversized popcorn boxes. #commissionsearned


A couple of tips for those of you who want to try out making these oversized popcorn boxes. They are made out of free refrigerator boxes from our local appliance store. Be sure to grab a couple of inexpensive nets and an electric balloon pump. If you line the inside top of the box with a net, you will need a lot fewer balloons. Also, be sure to blow up your balloons in a variety of sizes to give them more of a “popcorn” vibe, and use those glue dots to cascade a few popcorn pieces over the sides of the box. Painter tape is super helpful in making your red and white lines straight, and the popcorn logo was created on a piece of white poster board and taped onto the box. #commissionsearned
Be sure to subscribe to my blog for more amazing DIYs, crafts, and more. We are already planning next year’s show and it’s going to be a good one!!!


Halloween is just around the corner and my daughter wanted me to make her a fun Halloween tee on my Cricut Maker 3. I recently purchased a huge variety pack of HTVRONT heat transfer vinyl, a heat press machine, and a heat press mat, so I already had most of the supplies I needed. I found an inexpensive tee and went to work. #commissionsearned
We looked through the designs in Cricut Design Space and my daughter loved this “spooky season” SVG. I am still fairly new at layering heat transfer vinyl, so I was really pleased that this shirt turned out perfect. I started with the black vinyl and only pressed it for about 12 seconds. Then added the pink and orange. By cutting the carrier sheet close to the letters, I was able to press both colors at the same time. I only pressed this layer for about 10-12 seconds as well. I finished off by layering the white ghosts and pressed for an additional 20 seconds just to make sure that all of the layers were securely transferred to the t-shirt.
Here are a couple of important tips to remember when doing layers with HTV.
For more Halloween Fun, check out some of my other posts:
DIY Wings of Fire Dragon Costume

Recently, I picked up a set of blank tote bags to make some library book bags with my Cricut Maker 3. These totes are quite sturdy and they come in 26 different colors, so I definitely will be ordering more in the future. I also decided to purchase a year-long subscription to Cricut Design Space, and I have not been disappointed! The variety of fonts and images is beyond amazing.
My daughter loves axolotls, so this little pink cutie reading a book was the perfect choice for my girl. I found a gorgeous set of heat transfer vinyl on Amazon in boho colors. #commissionsearned. Full disclosure, as beautiful as these colors are, you definitely get what you pay for. This HTV was difficult to weed and I would only recommend it for projects with larger cuts. The more intricate ones were a bit of a pain, even with using the “more pressure” setting on my Cricut. But the colors kind of made it worth it.
For those of you who are new to using Design Space and to layering heat transfer vinyl, here is the step-by-step guide for how I made this fun tote.

Search “axolotl” in Design Space.

If you have not purchased a subscription, this image will cost $0.99. It’s free with a subscription.
Click on the image and then click on “add to canvas”

You can now size your image to fit your tote bag. You can easily add this to a t-shirt or sweatshirt as well.

I decided to add a bit of contrast with an oval behind the image. Go to shapes and choose
“circle.”

Now you will see a circle added to your canvas.

Go to “size” at the top tool bar and hit the unlock button. Now you can make your circle into an oval that covers your image.

You need to change the position of your oval so that it is behind your image. Go to “arrange” and click “send to back.”

Now you can change the color of the oval. I wanted mine to be the same color as the book that the axolotl is holding.

Make sure that your entire image is the size that you want to put on your tote bag.

Click “Make It.” I chose “on mat.”

Be sure to click “mirror” on every mat. This step is super important. And don’t forget that you will want your HTV to be shiny side down on the mat.
You can cut each color separately, but I have a little time-saving trick that I like to use. I move several colors onto one mat.

Click on the 3 dots to the left of your object.

Move the objects to the mat of your choosing.

As you can see, I was able to get 3 cuts on one mat. I used the grid to figure out the size of each color of HTV and where to place it on the mat. This saves a lot of time loading and unloading mats. Just be sure to put the right color in the right spot and remember to mirror your image.
You will be asked to select the type of material. I chose “everyday iron-on.” Make sure you have the fine tip blade loaded into your Cricut and now you are ready to go.
After all of your pieces are cut, you can weed each one and begin the process of adding the layers to your tote. I purchased the HTVRONT heat press and it made it so easy to layer the vinyl. I also got an inexpensive heat press mat that is the perfect size for totes and tees. #commissionsearned
One thing I like to do is to layer all of the pieces on each other before I use the heat press, just so that I get the placement right. Then, I peel them apart and layer, one at a time, starting with the back layer. In this case, my first layer was the blue oval.
You only want to heat each layer for about 12-15 seconds, and don’t forget to put a teflon sheet or a piece of parchment paper between your heat press and your HTV. Be sure to check the recommended heat setting and time for the vinyl you are using. Each brand varies slightly. You also need to know if your HTV is hot peel or cold peel.
This is the fun part…seeing your design come to life. In just a few moments, your tote will be finished and ready for your next trip to the library.
For more axolotl fun, check out my daughter’s DIY Axolotl Halloween costume from a couple of years ago.

Sometimes, I miss the days when my kids were little and life seemed a bit more simple. Everyone was tucked in by 8:00 and the house was quiet for several hours before my bedtime. But other times, I am so grateful for this season of life with older kids. There are joys to be found in all of the stages of parenting.
One of the milestones that we just said goodbye to is the season of lost teeth. Sometime this past year, my youngest lost her last tooth. Bittersweet for sure! I remember when my middle son lost his first tooth. He swallowed it while eating a pretzel and he was so worried that the tooth fairy wouldn’t show up. We reassured him that she absolutely would come and he wrote her a note explaining what happened to his very first missing tooth. Another time, the tooth fairy accidentally forgot… but wouldn’t you know that after searching around my son’s room we discovered that she actually did come, the money just “fell behind his bed.” A little parenting hack for those of you who may need to put this nugget in your back pocket just in case.
Even though my kids have outgrown the tooth fairy, I have several friends who have littles. I thought it would be fun to make them tooth fairy bags with some adorable SVGs that I found on Cricut Design Space. I have had my Cricut Maker 3 for over a year now, and if I am being honest, I feel like I am just now getting the hang of it. I was pretty intimidated at first, but now I feel confident that I can make a variety of projects that turn out AMAZING. These little tooth fairy bags are just one example.

Cricut Design Space has thousands of incredible SVGs to choose from, so it was hard to narrow it down to just a handful. I purchased a set of little canvas drawstring bags from Amazon and a bundle of HTVRONT vinyl with a variety of colors. I also invested in a mini heat press to make it easy to heat the vinyl. It took a few tries to get the sizing just right, and I added ovals behind the designs to give each bag a pop of color so that the white tooth really stands out. #commissionsearned
When you think about it, putting a bloody old tooth inside of a bag is kind of gross, so I ordered a set of tiny plastic containers and used permanent vinyl to make a little tooth sticker for the lid. This way, the kids can put their lost tooth in the container, and put the container in the bag.
I also created a little tooth chart so that kids can color in the tooth they lost and write the date. By the time they are done losing teeth, they will have a record of how old they were when they lost each tooth.


I’m getting ready to package these little kits up and send them off to my friend’s kiddos. I think they are going to love them!!! #commissionsearned

If you would like to use this tooth chart for your own child you can find the printable PDF on my Etsy shop thistlesandrainbows.etsy.com and the full Tooth Fairy Kits are also now available for purchase in my shop.
